
Blog Planning 101: How to Easily Plan Tons of Post Ideas That Drive Traffic

Whether you’re new to the blogging world or have been doing this for a few years, I’d venture to say all of us struggle with blog planning from time to time. You’ve probably got a million things on your mind with that endless to-do list on repeat; overwhelming thoughts robbing you from being productive in your business.
Yep, this was me too. That is – until I got organized and found a system that helps me to actually plan my blog posts and be intentional, rather than flying by the seat of my pants! Not only does it save me stress when it comes time to write posts, but it also makes it far more likely that my posts will get awesome traffic.
Disclosure: This post contains affiliate links. As an affiliate, I earn a commission from qualifying purchases.
The Strategy
Today, I’m going to teach you how to tackle this planning strategy yourself! At its core, this is a 3-part strategy for planning followed by a 2-part strategy for execution. Let’s break down:
Blog Planning:
- Make a list of possible blog topics
- Do your SEO research
- Stay on track with an editorial calendar
Content Execution:
- Create amazing content
- Promote your posts
The planning steps will take you a few hours max if you block out uninterrupted time to do it. And if you do, I guarantee you’ll be able to plan out several months’ worth of blog ideas in that time. (This of course doesn’t count the execution time of actually creating the content, which obviously takes more time and should be in-depth for each post.)
Let’s dig a little deeper into this foolproof formula to planning your blog posts so you can get organized, feel in control, and see that traffic start to climb!
1. Make a list of possible blog topics.
Time commitment today = 1 hour.
The first thing you’ll want to start with is making a list of every possible blog topic you can think of in the next 15 minutes that is relevant to your niche.
Don’t overanalyze this. Don’t worry about whether the topic is perfect, or whether it’s been written about by every other person. The only thing you want to worry about now is that it’s relevant to your niche. If your blog is about crossfit, don’t jot down ideas about reiki – stick with stuff that’s relevant.
Spend 15 minutes brain dumping blog post ideas into a word doc or google doc.
Once you’ve exhausted the 15 minutes of thinking on your own, it’s time to move onto a few other strategies for thinking through post ideas.
Spend 45 minutes researching other potential blog topic ideas through the following avenues:
- Browse other bloggers in your niche and see what topics they’re writing about – are there unique takes on a topic or extra expertise you have on the topic? (Your goal isn’t to steal content, obviously, but to generate new ideas on already popular topics.)
- Review this list of fitness blog post topics if you’re in the wellness niche.
- Search Google for some of the topics in your niche and develop additional ideas using the suggested searches (i.e the drop down box), the question area, and the related searches.
- Browse Pinterest to see what’s trending and what’s popular in your niche.
- Check out Facebook groups in your niche to see what types of questions people are asking. For example, I noticed a lot of people in dairy-free Facebook groups were asking about safe protein powders, so I created a comprehensive post on that over on Dairy Free for Baby.
Obviously, this does not have to be a one-and-done planning session, and you can continue to monitor these avenues for ongoing ideas. But for now, just spend 45 minutes adding to your brain dump list to come up with as many ideas as possible.
As an example, if I was looking to write posts related to running tips, I might take a look at the Google search box and questions like this (side note, someone asked about the numbers that you see on the Google drop down – those are not normally there; that’s because I have the Keywords Everywhere extension turned on):
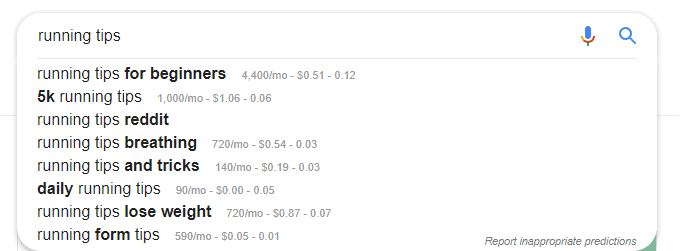

You can see this gives me some additional post ideas!
2. Do your SEO Research
Time commitment today = 1-2 hours
If you’re not familiar with the phrase SEO, it stands for search engine optimization. Essentially, it’s using specific strategies to help your post rank on Google or other search engines.
These strategies include:
- a. doing keyword research – which is the step you’ll take now as part of your blog planning
- b. optimizing your on-page SEO for that keyword and its variations – which is the step you’ll do when you write your content
- c. building backlinks – which is the step you’ll do after publishing your content
As part of your planning process today, I want you to spend about 1-2 hours doing step (1) in this list, the keyword research.
Keyword research tools
You’ll need to choose a keyword research tool to use for this. Here are the three options I recommend:
- KeySearch (paid tool) – perfect middle of the road option that’s inexpensive yet gives you a ton of helpful data (around $15-18/month, use my link and code KSDISC for 20% off)
- SEM Rush (paid tool) – the big boy in SEO research; jam packed with lots of information and excellent for pro bloggers (around $99/month)
- Ubersuggest (free tool) – Neil Patel’s tool which is free; very useful but just doesn’t offer quite as much data as the other tools and I find it to be glitchy. (Even as I’m writing this, I went to grab a screenshot to share and I can’t seem to search for anything right now.)
All of these platforms are built to give you information on both:
- Search volume – how many people are searching for that particular term
- Competition – how difficult the tool estimates that it will be to rank for that keyword
You’ll also hear a lot of people recommend the Keywords Everywhere extension for Google, and while I love that extension for seeing search volume – keep in mind their competition score is not based on ranking; it’s based on ads. For this reason, I recommend one of the other tools above for your research (but using Keywords Everywhere on Google can be really helpful on a daily basis).
Doing keyword research
Now take whatever tool you’ve chosen to use, and start typing in your blog post ideas from the list you created in step 1. You want to try to find the best keywords that have a relatively high search volume and a relatively low competition.
For example, let’s pretend I’m a fitness blogger and I have these two ideas as the first ones on my list:
- Proper squat form
- Elliptical hiit workout
You’ll type the first phrase on your list into the tool, and it will give you the volume and competition score for that phrase.
Here’s what I found for that first phrase in KeySearch:

That tells me that although it’s searched for a lot (12,100 times a month) – getting it to page 1 of Google would be very difficult (red competition score = difficult).
Now if I look for the next idea on my list, here’s what I see:

That tells me this might be a better post to write about. Even though it’s only searched for 1600 times a month, that’s still in the realm of a good volume to aim for, and the competition is easy-moderate.
When you go through this process, all of the tools I mentioned will also give you related ideas, and the ability to see their volume and competition. It’s kind of like a treasure hunt – you want to look and see if you can find any hidden gems in that related list.
Again, the best keywords (from your list or from this related list) are going to be options that have relatively high search volume and relatively low competition.
I know that this seems very complicated but it doesn’t have to be. I wrote a really comprehensive post about how to do keyword research using KeySearch which walks you through all this in way more depth. It showcases that tool but all the concepts and tips are applicable to the other tools as well.
And just as a heads up, depending on the tool you’re using, you may have to split the work in batches because some tools only allow for a certain number of searches per day.
Updating your list
As you’re doing this research, you want to start editing that running list of ideas you created back in step one.
Keep the keywords on your word or google doc that are high volume/low competition keywords. Jot down their search volume and competition score next to it so you have it to refer to.
Also, add to your list any good related keywords that prompted new ideas, and include the search volume and score for those.
*These are the keywords you’ll want to focus on for your posts.*
If there are keywords on your list with very low search volume or very high competition, go ahead and delete those (unless you think they’ll make an excellent viral post on social media, in which case you can keep them regardless).
When you first start this planning process, you might be disappointed to come across a lot of posts that don’t make sense to write – i.e. that no one is searching for, or that are too hard to rank for. That’s completely normal. It gets easier as you go along, I promise!
Does every post need a good keyword?
In a perfect world, yes!
But occasionally there may be topics you really feel called to write about and perhaps you know they could be viral topics for Pinterest or Facebook. In that case, it’s fine to choose a keyword that’s either low volume or high competition. You’ll probably never get much Google traffic from it, but it’s fine to write some content just for those for social shares.
If you have a few topics on your list like this and you want to write a post about them, feel free to leave those on your list.
3. Stay on track with an editorial calendar
Time commitment today = 30 minutes to 1 hour
At this point, you should now have a list of blog topics that you’ve narrowed down to only the high volume, low competition keywords and perhaps a few additional posts that are not for SEO but that you think will do well on social.
Now it’s time to plan your editorial calendar. In a blogger’s world, an editorial calendar is more than just a regular calendar; it’s a strategy builder for your business!
You can use anything you’d like as an editorial calendar – I use CoSchedule because it’s really comprehensive for managing multiple sites (you can see my review of CoSchedule here), but you can also use a Google calendar or a standard paper and pen calendar.
First – think about your time (realistically)
Before constructing the calendar, think about how much time you actually have to be productive for your blog. This will determine how many tasks and posts you can write and promote in a week or a month.
If you’re just getting started, I recommend starting with at least 1-2 pieces of excellent content each month.
More is better, so long as you can produce the best quality possible. With every post you’re writing, you want to try to make it one of the ten best pieces of content on the internet.
It’s far better to have 10 amazing, in-depth, SEO-optimized posts – than 50 pieces of thin, crappy content.
To give some perspective, I try to get at least 1 post a week up on my main blog, and at least a few posts a month up on my other niche sites (including this one).
Set a goal that’s attainable based on your current schedule. If you’re just getting started and not sure how long it will take you to create an awesome piece of content, estimate at least 4 solid hours for each post. Some people are faster, some are slower – but I think this is a good ball park for the post research, writing, editing, graphics, etc.
Next – plugin your post ideas
You’ve set a goal for how many posts you want to publish each week/month. Now bring up that list of post ideas, and just start plugging your best ideas into each week/month.
Yep, that’s it!
At its core, an editorial calendar for blog planning can be this simple – just a calendar of when you plan to publish posts and what those post topics will be.
Keep in mind that it does take a while for a post to pick up in Google, so if you’re planning to do seasonal content – like healthy pumpkin recipes for fall – you probably want to publish them in the summer rather than the fall. You don’t have to promote them in the summer, but publishing in summer gives your stuff a chance of ranking by the time people are looking for it.
You can also think about doing content related to those random holidays that you’ll write and publish that day for social traction. For example, you might post a healthy donut recipe for National Donut Day.
What else can you put in your editorial calendar
How much additional stuff to put in your calendar depends on what kind of person you are. Do you need tons of structure, with every day time blocked? Or can you function well just with a general idea of what needs to get done this month, letting your energy levels dictate your schedule?
I personally use my calendar for three things:
- Planning out post ideas (including ensuring adequate space for sponsored vs. non-sponsored content*)
- Planning social shares for Facebook, Twitter, and Instagram (for Pinterest, I automate via Tailwind)
- Keeping track of deadlines for sponsored content
*Regarding sponsored vs. non-sponsored content: Even though all my content is authentic, I still think it’s important for your readers to see a balance of sponsored and non-sponsored content. If you have a few sponsored posts coming up, try to make sure you insert at least one non-sponsored post in between.
Additional ideas
You may want to get way more detailed in your calendar for blog planning, and that’s fine too. Perhaps you’ll include or organize….
- Research time: For topics or for SEO
- Creation: Blocking time to draft your blog post and optimize for SEO
- Graphics: Finding images for your posts, creating images for social media
- Social Media: Sharing to all platforms you are apart of, sharing on group promo days if applicable
- Freebies/Opt-Ins: Creation and promotion of lead magnets
- Newsletter Creation: Your email list = your people and they are loyal. Be sure to reach out regularly.
- Holidays: Include holidays – both real and silly – in your editorial calendar so you can plan our social shares or content shares as appropriate. For example, I did a big social push for my homemade beef jerky recipe on National Jerky Day.
- Free time: Blogging is a lot of work, and you can burnout fast if you aren’t careful. So you might time block plan self-care and free time too!

Your Turn for Blog Planning
Now that you’ve read through all this, it’s time for you to put all this into action. As you can see, it will take you a few solid hours of work – but that lets you plan your blog content for a few months!
Of course, then there are the other two steps related to content execution that you need to go ahead and apply after that – and those are crafting awesome content and promoting your content.
I’m not going to get into them in as much detail in this post, but here’s a quick summary:
4. Crafting Awesome Content
This is as simple as it sounds. Create awesome content. That means:
- Write really helpful posts that solve problems or inspire your readers. This is the number one thing to focus on. Many bloggers make the mistake of making posts too “me-centric.” While weaving in personal stories and anecdotes is awesome, remember that the true focus of your post should be the reader.
- Optimize content for on-page SEO. You want to write for humans first, but (like it or not) you are also writing for Google. Include your primary keyword and variations of it in key places in your posts (paragraphs, titles, headings, alt-text, etc.) as it makes sense. You can read more about SEO in this post.
- With that being said, do not stuff your posts with keywords just to rank. Google is smarter than that. That’s spammy and won’t get you anywhere.
- Aim for as many words as you need to comprehensively address the query. There’s always disagreements about this in the SEO world. The truth is, there is no “official” word count minimum for any keyword. You might need a post that’s 700 words to satisfy the user intent, or you might need a post that’s 3000 words. Do what makes sense for that keyword. It is helpful to look at the average first page result on Google for the keyword to get a sense of what they think it needs, though. For example, if every page one result is around 2000 words or more, it probably (though not definitely) is a signal that 500 words won’t cut it. TLDR: Don’t write fluff for the sake of writing more words, but you do want to make sure your content is really comprehensive and answers the query.
- If you find yourself running low on time, write fewer posts but make them better – make them beefier (is that still a word? Haha) and more helpful than what’s currently out there – and choose the best keywords for these.
5. Promote blog posts
When it comes to learning how to promote blog posts for maximum visibility it usually comes down to trial and error. Sometimes what works for one blogger won’t work exactly the same for another blogger. That said, I’ve found Pinterest is one of the better places for most newer bloggers to spend their time as it relates to growing traffic.
Here are a few tips to help maximize your promotion:
- Share your posts (mind-blowing 😉 ). I mean, this is pretty self explanatory, but the first step is simply to share them yourself to all the platforms you use! As I mentioned, I think Pinterest is one of the better options out there for bloggers because you don’t need a lot of followers to generate good traffic (though Pinterest has definitely changed a bit in the last few years; it’s a slower burn now).
- Schedule Content Shares. To stay consistent, it’s really helpful to schedule shares out rather than attempt to remember to do them every day manually. You can use a tool like Coschedule, or you can use the native scheduler in a platform like Facebook or Pinterest. Be sure that you have a routine in place for sharing your newer content as well as older content to gain maximum blog post visibility.
- Create Great Images. In order to get maximum visibility on your blog posts, you’ll need to create great images for your content. Your featured image should be 1200px wide (for the chance of Google Discover traffic), and I generally use square or horizontal for that. Images in the post help break up long blocks of text and improve readability. You may want to also include a vertical image for Pinterest.
- Have Social Sharing Icons on Blog Posts. This will not only make it easier for readers to share any content they think is unique or helpful. As part of this, you’ll also want to be sure to set the description for Pinterest so that when readers share your pins, it has a good keyworded description.
- Send it out to your email newsletter. If you do a weekly newsletter, include some original content and then include a link to a recent post. Or, set up an automation series with your newsletter where you lead people through your most valuable content when they sign up. Just be sure to regularly stay in touch with your list.
Alright friends, what are you waiting for?! Get to blog planning now and let’s get that traffic going!
Share with me: How do you do your blog planning? Do you have any questions that I didn’t answer in this post?
Feel free to pin this post to save for later!


4 Comments
Sharon Templeton
I just loved this post and it helped my so much that it motivated me to write my first blog post on 10 ways to better sleep.
https://nestandtemple.com.au/2020/05/03/10-simple-ways-to-better-sleep/
Thanks Chrissy.
Sharon x 🦋
Dee
Nice outline, but you have a typo in the 2nd paragraph…..safe me stress (think you mean >save<
Dee
Nice outline, but you have a typo in the 2nd paragraph…..safe me stress (think you mean >save<).
Chrissy Carroll
Thanks, fixed! 🙂