How to Start a Fitness Blog – Everything You Need to Know!
Thinking about starting a fitness blog or a wellness blog? Yahoo for you! Running my fitness & food blog is one of the most gratifying jobs I could imagine. Don’t get me wrong; it’s a lot of hard work – but when you enjoy what you do, it makes life pretty amazing.
But it was also overwhelming at the beginning trying to nail down all the specific logistics of how to start a fitness blog. I’m hoping I can help make the process smoother for you, now that I’ve been rocking and rolling in this for the last five years.
Disclosure – This post contains affiliate links. This means that I may make a small commission if you make a purchase using them. It doesn’t change your user experience in anyway.
There are 6 steps that will help you starting your fitness blog:
- Decide your niche.
- Choose a fitness blog name.
- Choose a blogging platform and hosting.
- Set up WordPress.
- Change from HTTP to HTTPS.
- Start writing and publish a post!
Let’s break each one of these down…
1. Decide if you’ll start a general fitness blog or have a specific niche.
Even though “fitness” or “wellness” seems like a niche itself, there are so many areas within those topics that you can focus on.
For example, from the fitness angle: Are you into crossfit? Do you love yoga? Are you a passionate runner or triathlete? From the wellness angle: Are you going to be blogging about weight loss? Mindful eating? Self care?
Think about what you want to write about and consider if narrowing down to a certain niche makes sense.
Choosing a very specific niche generally helps you to grow more quickly. You become known for that topic. This helps you to grow more quickly on social media. It doesn’t mean that you can’t also bridge in other related topics, though. If you’re a running blogger, for example, you might also incorporate some information about yoga to balance out training.
Narrowing down to a certain niche also doesn’t mean that other people outside of that audience won’t read your content. For example, my fitness & food blog focuses on runners and triathletes. However, I still get plenty of people visiting the site to read recipes that don’t necessarily fit that audience. I just make sure that I’m intentional with my writing with that audience always being in mind.
You can also choose to be a general wellness or fitness blogger and cover a whole host of topics. The downside to this approach is that it can be harder for you to become established as an expert across all realms of fitness. The upside is that it may be easier for you to think of lots of topics to write about.
2. Choose a blog name.
Once you have decided on your blog theme, next comes the key step picking out a great name. Consider these factors when choosing a wellness or fitness blog name:
Personal name versus blog name.
Some people will simply set up their website domain as their personal name. If you’re already a well-established expert in the fitness realm – that can be a great strategy since people already know you.
Many people take the route of choosing a catchy blog name, though. If you’re not personally well known, a catchy name might be easier for readers to remember. It’s also the right strategy if your own name is particularly hard to spell.
Consider your niche and audience.
Choose a name that will be relevant to what you’re writing about and/or who you’re writing it for. For example, I love Run Eat Repeat – you know that she’s going to be sharing info about running and eating. Same with The Fitnessista – it’s clear that she’s going to be providing fitness tips for the ladies.
Consider length and spelling.
You don’t want your blog name to be super long, because it’s something people have to remember to type in their web browser. Don’t go longer than a few words. You also want to make sure that it’s easy to spell and not confusing.
Brainstorm on paper.
The best advice I ever got was to just start writing down lots of names on paper. Anything that comes to your mind. It will help get the creative juices flowing, and then you can start thinking of synonyms and variations on what you wrote down. Eventually something will just click and you’ll find your name!
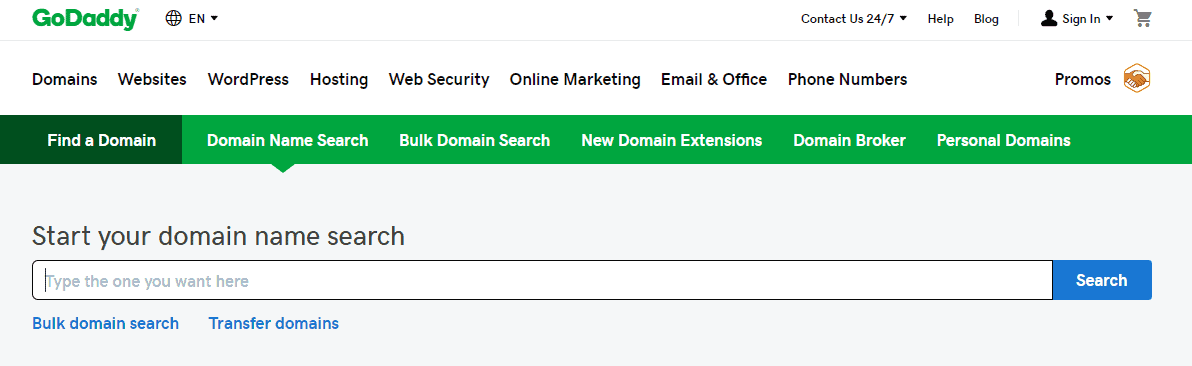
Make sure it’s available.
Once you have a name you’d like to stick with, make sure that both the domain name (as a .com) and social handles are currently available. You can check domain availability on GoDaddy – just visit their site and you’ll see a screen like the one below where you can enter your name choice to see if it’s available for sale.
While some sites will tell you to look beyond the .com, I recommend sticking with .com – at least for now. While you can look for things like .fit or .co, 90% of the population is used to typing in .com at the end of a website, and that’s what they are likely to remember.
Pro Tip –> Secure your blog’s domain name and social handles before telling anyone the name. I’ve seen many cases of aspiring bloggers sharing possible name choices in Facebook groups, only to find out that someone else swiped an amazing name idea.
If you’ve got your name all set, it’s time to purchase the domain and move onto the next step! You can easily purchase it through a site like GoDaddy if you just want to buy it but aren’t ready to get your site up and running just yet.
Or, purchase the domain and hosting all at once (as described below). This is simple and easy to do!
3. Choose a blogging platform and hosting.
First, let me give you a metaphor that might make all of this easier to understand. Think of a blog like a house:
- Your domain name is the address of your house. (For example, for this site, you have to type in www.buildawellnessblog.com to get here.)
- All of your content and information is the house itself.
- And hosting is the land that the home is built on.
Hold that in your head for a minute, because I’m going to get back to it. 😉
There are two primary categories of website hosting for bloggers – self-hosted sites and hosted sites. Self-hosting (for most people) involves using a blogging platform like WordPress.org and then paying a hosting company. That hosting company stores all of your website data on a server. When someone types in your site address in a web browser, the server connects and displays the site.
Hosted sites, on the other hand, include all-in-one blogging platforms like Wix or Wordpress.com. You build the site on their blogging platform and then they also include hosting right on their own servers.
If you have plans to monetize your blog (and not just use it personally for fun) you’re going to want to use WordPress.org and be self-hosted. When you are self-hosted, you retain full control over your website and have more flexibility for including advertisements or for customizing your site.
If we get back to the house analogy, you can think of it like this:
- Self-Hosting = Owning the land that you build your house on, you can do whatever you want – woohoo! – but you also have to take care of any issues that come up.
- Hosted = Living in a condo. You still have lots of amenities and a place to live and a lot of support, but there are rules that must be followed and limitations that may be put into place.
So again – I highly recommend that if you want to make money with your blog, you choose Wordpress.org and choose self-hosting.
As far as hosting companies, there are several major ones to choose from, including:
The first two are a bit more targeted towards beginners, while the later three have more comprehensive options for bloggers with quite a bit of traffic. That said, all can be used from the start depending on your budget and preferences.
My personal recommendations?
- If you have a decent starting budget, my favorite hosting company is BigScoots. They offer excellent service and fast speed. Their managed WordPress hosting starter plan costs $34.95/month and is good for bloggers with up to 250K monthly visits. That said, I know that price may be unfeasible for many bloggers who are just starting.
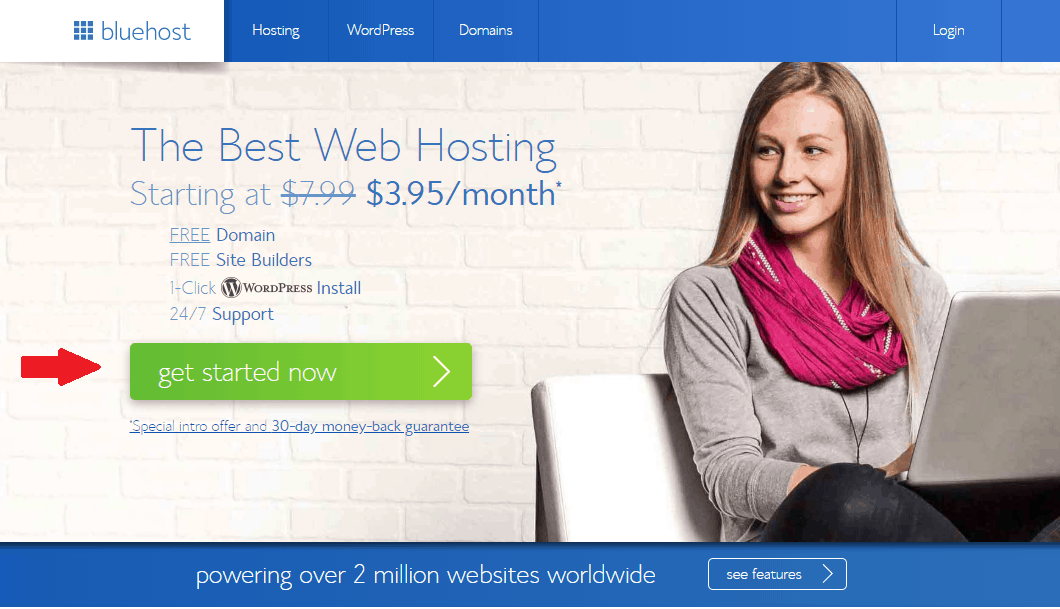
- If you’re just getting started and are on a tight budget, it’s probably easiest to start with Bluehost – simply because it’s a low cost investment when you’re not yet making money. The Bluehost hosting plan for the first year is very inexpensive. In fact, when I started this website, I paid for my domain plus 3 years of hosting for under $100. The prices may fluctuate a bit here and there, but you can typically grab your first year of hosting for around $50-75.
I’ve typically used Bluehost when starting my websites, then switched them over to BigScoots down the road.
Yes, any of these require a little bit of money up front – but it’s worth it if you want to make money from your fitness blog eventually. Think of it comparably to building the foundation for a house – you don’t want to skimp on that.
PS – While I have heard from some other bloggers that they aren’t huge fans of Bluehost, I can only speak to my experience which has been quite positive. I’ve never had any serious issues with them in the last 9 years. Some small hiccups occasionally, but that’s par for the course with most technical things. Their loading speeds tend to be a bit slower, but not prohibitively slow for someone just getting started. Again, it’s really weighing cost and deciding what’s right for you.
PPS – You can always change the hosting type (like from a basic to premium plan) or hosting company later on, so don’t feel like this is something you are locked into for life.
Here’s everything you need to know to get started with BlueHost:
First step is to just visit their site and click the “get started” link:
It will bring you to a page with a few different hosting packages. If you’re familiar with hosting and the technical side of things, feel free to evaluate these options thoroughly. For most people just getting started, though, I recommend selecting the basic plan.
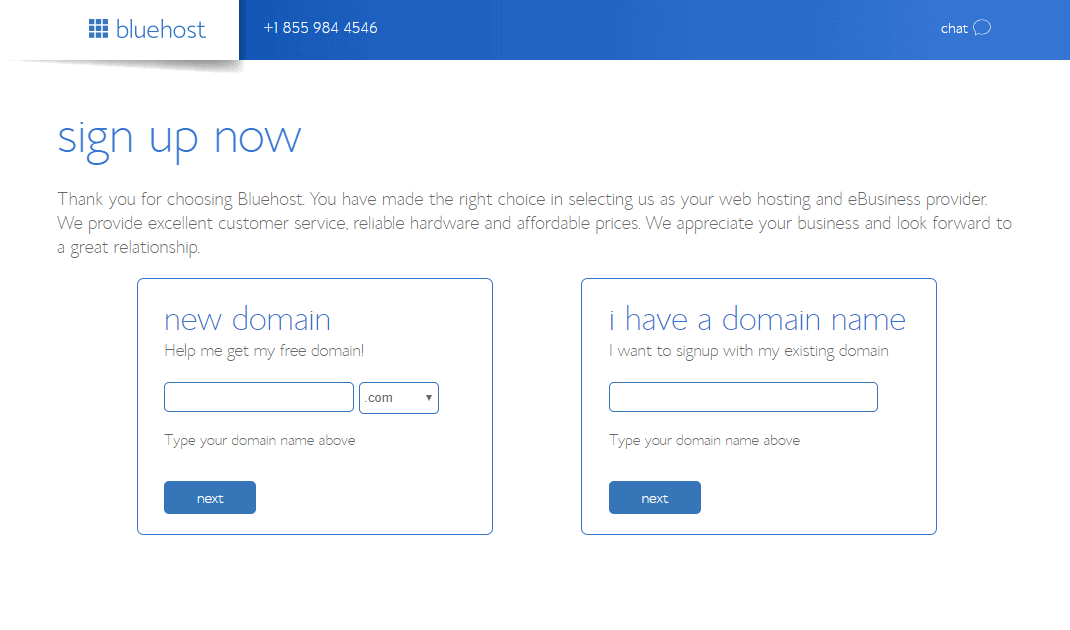
After you choose the plan, you’ll be taken to the page where you can purchase your domain name. Type the name you are hoping to use into the “new domain” box. If you already purchased it through another site, then you can enter it into the “existing domain” box.
(Note: It’s usually good practice to purchase your domain and hosting separately – that way in the event one of those accounts were hacked, they don’t have access to both things. This requires some additional technical steps as far as connecting your domain to hosting though).
Once you’ve got your domain selected, you’ll get to the checkout page where you can confirm the time frame for hosting and any add-ons:
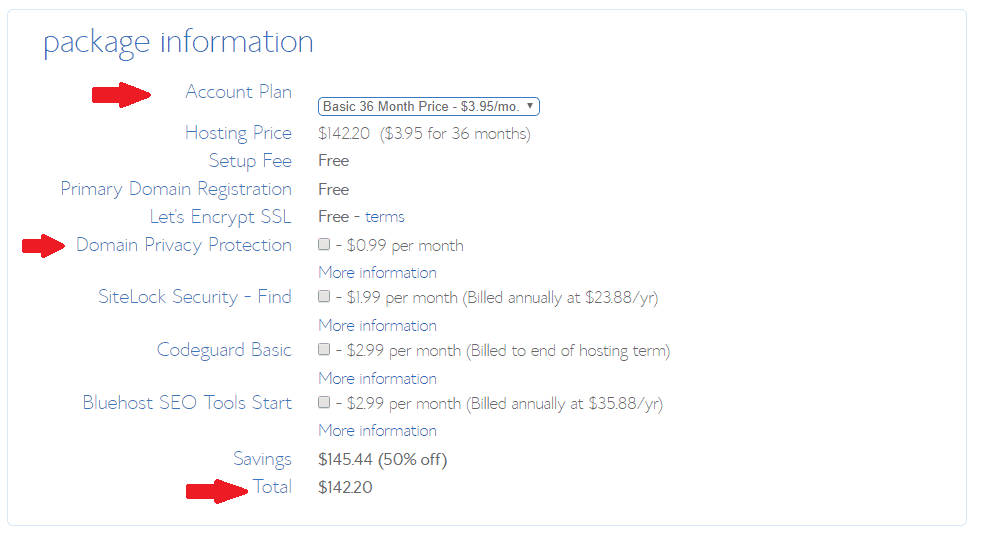
A few helpful notes about what you’re seeing on this checkout screen:
- The default drop-down box for the account plan is 36 months. You can change this to 12 months, 24 months, or 60 months. The breakdown of the monthly rate increases if you choose a shorter time frame.
- It’s completely up to you whether you’d prefer to lock into a longer plan for a lower rater or select a shorter plan for a higher rate. I have usually just purchased the 36 month plan up front because a) it brings the monthly breakdown to a very low cost, and b) the renewal costs are generally higher than these intro offers, so it assures you the cheapest hosting for the longest period of time.
- The plan is broken down per month in the drop-down box but note that you are charged up front for the entire time frame. This is displayed in the “total” at the bottom.
- Domain privacy protection is an optional add-on. There is a large database called the “whois database” that holds information about website owners, including contact info like your address and phone number. Privacy protection helps keep some of this private from those searching the database. I’ve never used this option, but if you worry about privacy – feel free to enable that at a low additional cost.
4. Set up WordPress
Once you’ve purchased your domain and hosting, you are ready to get your fitness blog started.
If you’ve purchased hosting with BlueHost, you should be directed to set up your password and login to WordPress right after you complete your purchase. It’s very simple now because they pretty much get everything set up on the backend for you.
If you’re using another hosting company, my guess is that they’ll have easy instructions for you to set up WordPress after you purchase!
Here’s what the backend of WordPress looks like when you’re logged in – you can kind of ignore whatever is in the center for now; just now all the tools and menu options you’ll need are on the left-hand side.
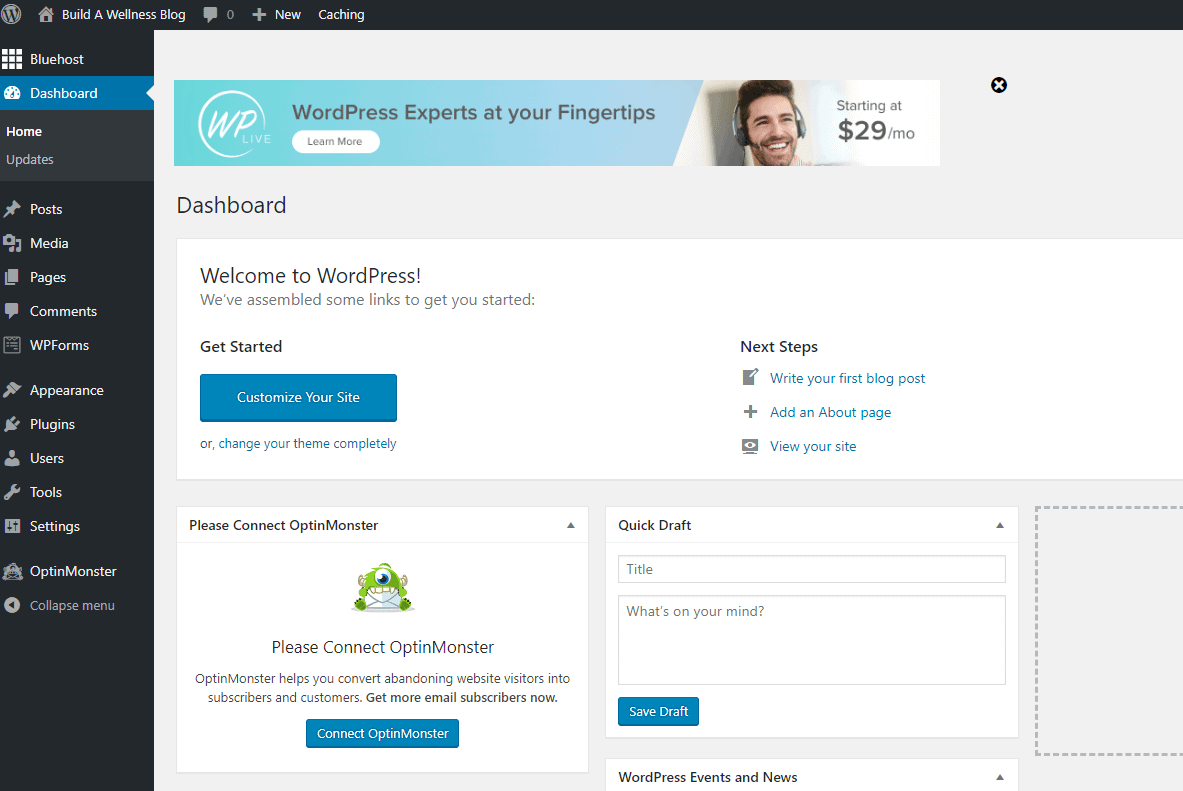
There are a few areas here that you’ll want to address before publishing content (also, you’ll want to complete the next step before publishing as well!):
a. Change your permalink structure.
Permalinks are the structure for your blog post links after your domain name – for example, this post is set up as: www.buildawellnessblog.com/start-a-fitness-blog/.
Choosing the right permalink structure is important because it impacts SEO (search engine optimization) to a minor degree, but more importantly makes it easier to update posts later when you do not include dates in the permalink.
Ideally, you want short and sweet permalinks that contain the keywords for your blog post and no dates.
To check your permalink structure, hover over “settings” in your menu on the left. Then click on “permalinks”.
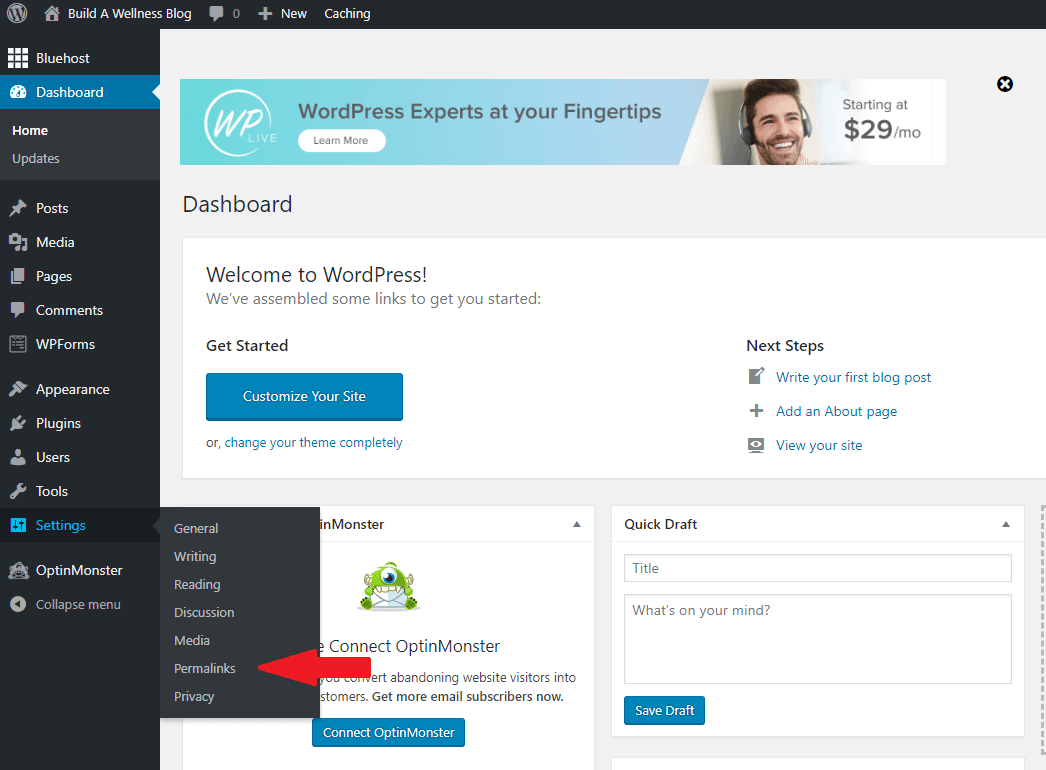
When you click on that you should see a screen that looks like this:
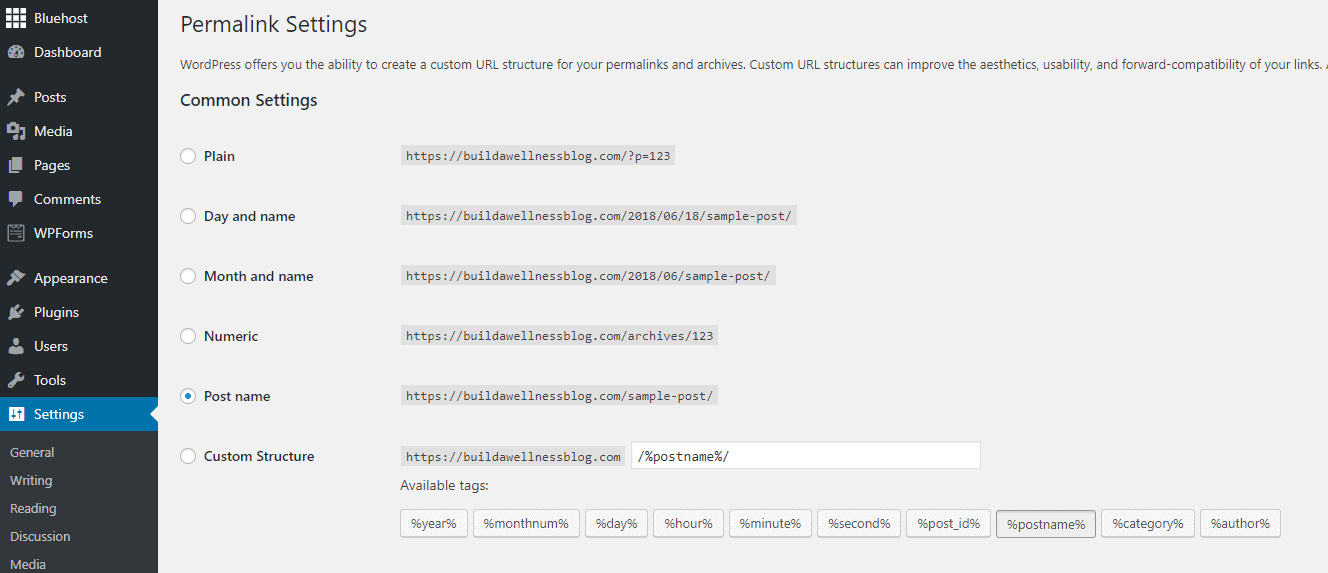
The default permalink structure is usually set to “plain” and this is not ideal for SEO. Instead, change this to the “post name” structure. Then just click “save changes” and you’re all set.
You want to make this change before publishing any posts because if you do it after, it will “break” links and then you’d need to redirect them.
PS – You can always change an individual post’s permalink within the post itself when you’re drafting it, but it’s best to have the general structure in place too in case you’re not familiar with how to do that.
b. Choose a theme.
There is likely a default theme that was put into place when you signed up for your site, but you probably want to choose something that you find visually appealing. To start, hover over “appearance” in the menu bar on the left side, and you’ll see an expanded box – choose “themes” from this box.
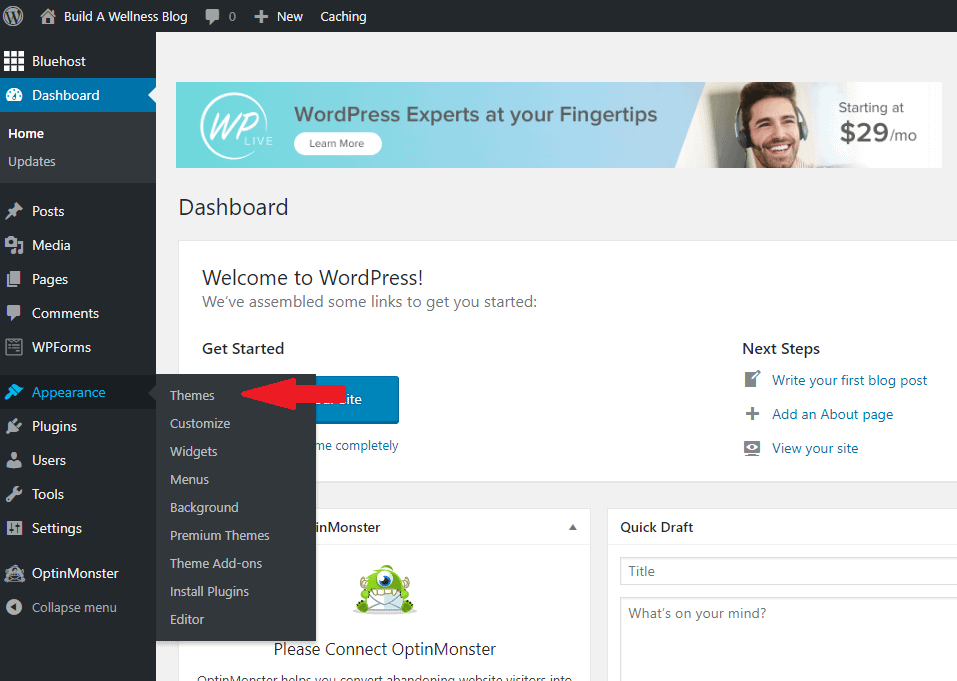
This will bring you to the free themes which are already installed. You can also click “add new” and look for free themes which you can install.
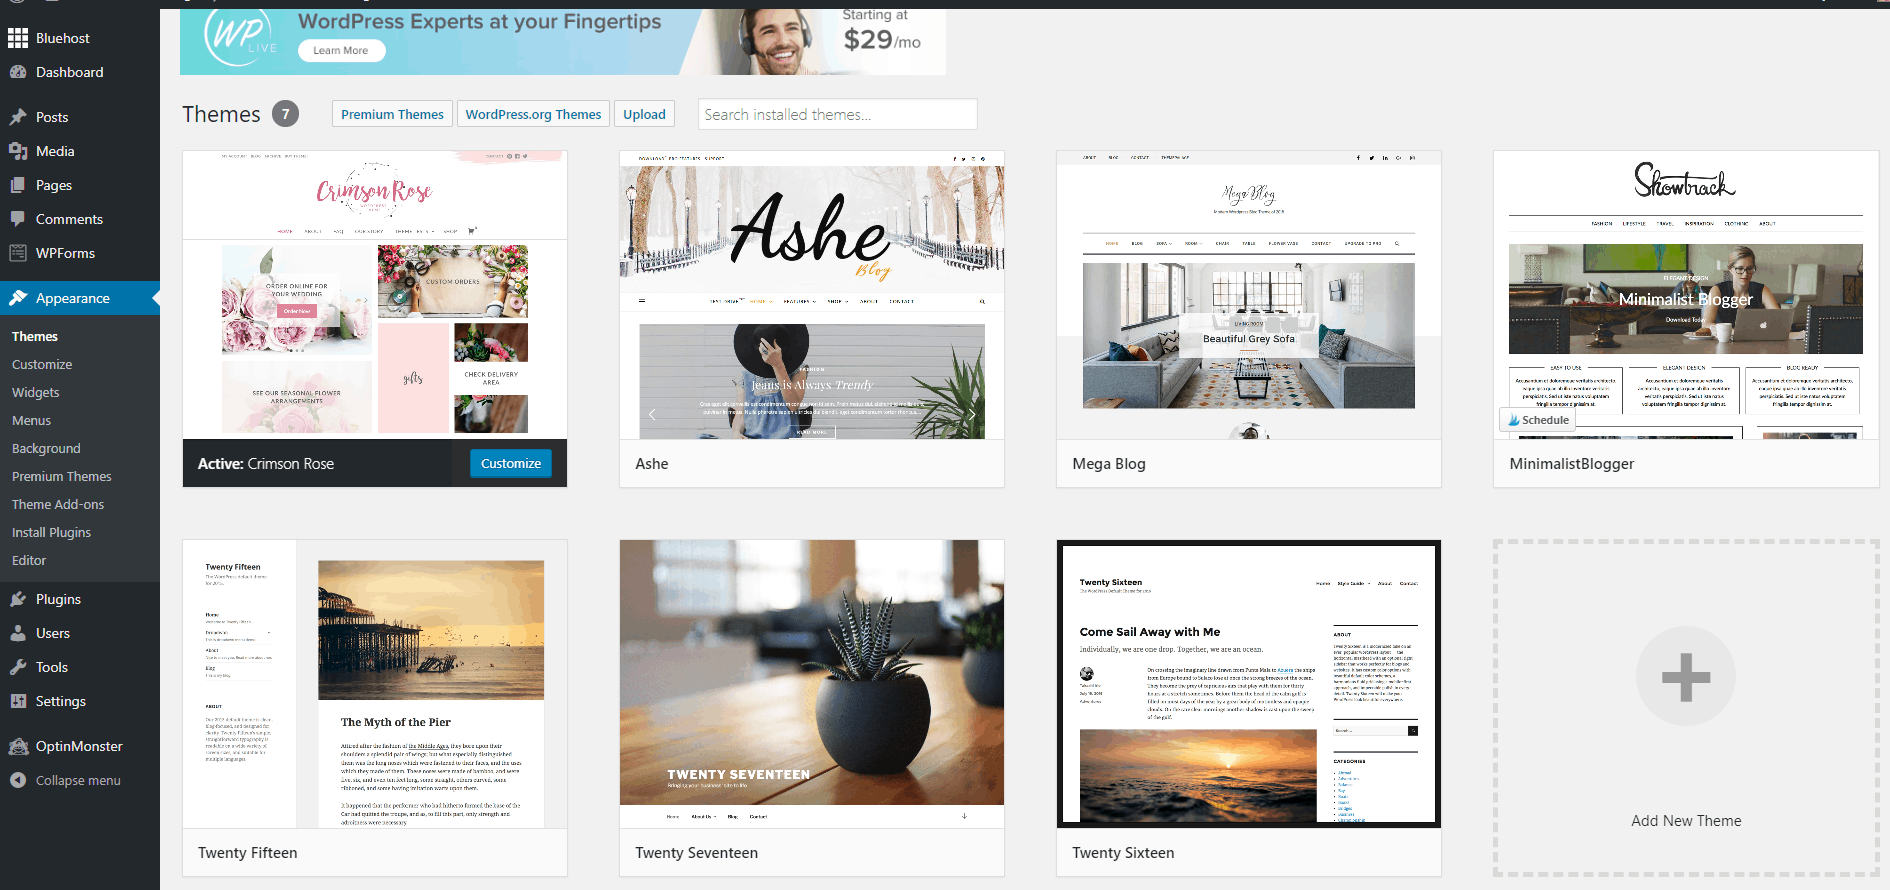
Play around with these by selecting the live preview to see what your site would look like in each case. You can upload media with any logos and/or headers that you have at this point to see how they would fit and look within the theme – but if you don’t have that ready yet, just play around and find something that looks nice to you.
My two favorite free themes are Kadence and Astra. Both are easy to use and fast.
At some point, you may want to upgrade to a paid theme. Paid themes typically deliver extra customizability, better customer support, and may be updated more frequently. That said, it’s certainly possible to build a successful site while sticking with a free theme.
For now, feel free to choose any free theme that works for you. You can always change these later. Themes can be updated at anytime!
5. Change your site from HTTP to HTTPS
This sounds techy and a lot of it is above my head, but hopefully I can make it clear why you should do this. 🙂
Google announced in 2017 that they would penalize websites in search results if they did not have https (rather than http) enabled. Essentially, it’s just a more secure version of your website using an SSL certificate – a “secure sockets layer”. And if you signed up for hosting with BlueHost, you can enable a free SSL certificate right in your account. Some other hosting companies also provide a free SSL; just contact them to find out.
As of 2022, this may automatically be enabled on your Bluehost account, or you may need to manually do it.
To manually switch from http to https with BlueHost:
First, login to your BlueHost account. When you login, click on “my sites” in the menu on the left site. You should see a box with the name of your website. Hover over that box and two options will appear over it – you want to click on the “manage site” option.
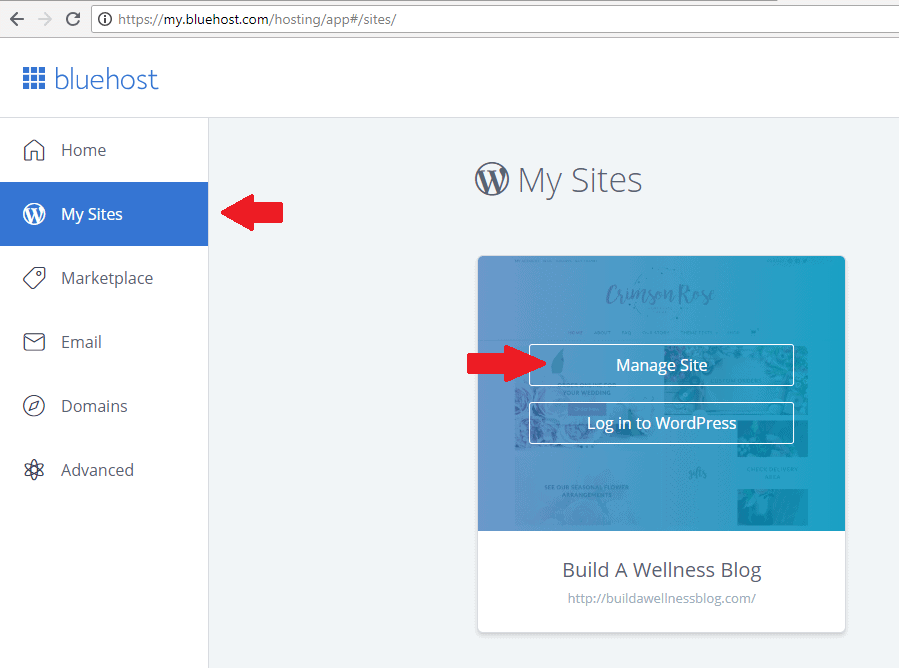
Then click on the security option in the top row of menu options that appears. From there, just toggle the “free SSL” button to “on.”
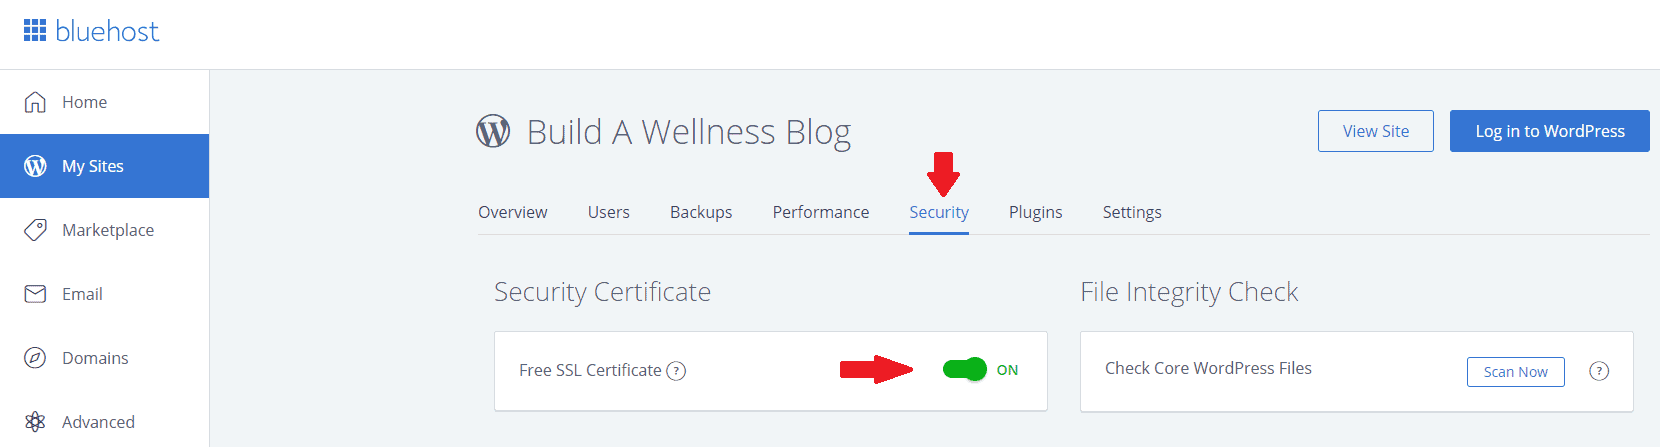
It may take a few hours for the change to process on your website, but it should be all set fairly soon.
In some cases, you may need to take an additional step:
You’ve installed your SSL certificate but you may still need to “tell” WordPress that when it displays your site, it should use https rather than http. You can do this by adding a line of code (something I don’t know much about) or simply calling BlueHost or your hosting company and asking them for help with this part (that’s the route I went, haha!).
You can check in a few hours by typing your domain name into your browser. If it appears with an i with a circle around it or a warning, it’s still unsecure. That could look like this:

If it appears with a padlock, the SSL certificate is working and it’s all set!

If you’ve gone through all these steps and a day later your site is still unsecure (i.e the transition from http to https doesn’t seem to have happened) – call your hosting company or find a tech support person to help you.
Pro Tip: Some people will ask if you MUST change to https. At this point, I’d say the answer is yes. You will be penalized by Google in search rankings now – and I have a feeling that within a few years this will become a mandatory requirement. Taking care of this now is much easier than doing it down the road and dealing with site redirects!
6. Start writing and publish a post!
Now that you have taken care of all these important logistics, it’s time to start writing!
A lot of us go through analysis paralysis when starting a fitness blog. We tweak every little design flaw, rewrite drafts of posts, and hem and haw about when to “go live.”
Stop that. Right now. 🙂
Don’t worry if your design isn’t perfect or exactly how you want it. There is always time to fix those issues later.
Get your first post up, publish it, and share it. Then aim for consistency – set a certain number of posts that you have a goal of publishing each week. I recommend a minimum of one per week, with most bloggers aiming for 1-3 posts per week depending on their niche and the depth of the content.
Blogging is really a long-term game when it comes to building traffic and income, so the sooner you start publishing content and getting viewers, the faster you will grow.
There you have it – everything you need to know about how to start a fitness blog! Once you get through all these basic steps, you’ll want to learn more about growing your traffic and different methods of monetizing your blog. I’ll be sharing more of those tips in upcoming posts. But for now, focus on just getting started! 🙂
Feel free to pin this post so you can refer to it again later and let me know any questions you might have in the comments.
Share with me: What other questions do you have about how to start a fitness blog? If you’re just getting started, what will your fitness blog be about?


28 Comments
Coco
Great tips! I was told switching to https would cost $$$ to do coding. I will see what I can figure out through my host ….
Chrissy Carroll
If you already have a site, switching to https becomes more complicated because all the old posts must be redirected. My tech guy took care of that for me on my other site for a very inexpensive fee though. Let me know if you want his contact info!
Vipul Singh
Hello I have just started my blog on fitness, so please can you check it and tell me how can I improve on it. I have published 3 posts till now.
Zainab
Whoa that one awesome post👍👍 all details & nothing left to search 🙂
Chrissy Carroll
Yay, so glad you found it useful!
abdessalam eljabali
this is my website about fitness and health i hope you like it and give a feedback http://www.heathffirst.com
sakshi rakshe
well these tips were really helpful but still i am a beginner and as a student i don’t earn so is it ok if i’ll just start it in free will i still get viewers for my blog or you have to buy domain or hosting???
Chrissy Carroll
Hi there! You can certainly still start on a free plan like Wordpress or Blogger. It’s definitely possible to get viewers on there, especially through social, you’ll just a) have potentially less control over SEO, and b) have potentially fewer options to make money from the blog.
Keep in mind if you do want to monetize it and decide to self host from the beginning, you can generally get a domain name and a few years hosting over on BlueHost for about $100, so it’s pretty reasonable if you end up taking the plunge to pay 🙂 Good luck!!
Paul
Hi Chrissy!
How long did it take you to start making a profit from day one of starting your blog?
Chrissy Carroll
Hi Paul – My first blog wasn’t geared towards making a profit, but in generating trust and leads for 1-1 nutrition counseling. So that one, from 2010-2014, never made money individually. My “real” blog – aka the one I still have now that I started in 2014 – started making some income in the first year, hit a great part time income 2016-2017, and then hit full time income in 2018. I work part time hours (home with my kiddo) and didn’t start really focusing on generating a real income from it until 2017, so I probably could have moved through the process much quicker had I focused sooner OR had additional work time, haha. (I also have two other niche sites that I started less than a year ago, I’m hoping by next year at this time they’ll be hitting around 10K/year in passive income each.) I hope that helps – feel free to let me know if you have more questions about it!
Sravanthi
Thanks for sharing this wonderful blog
Chrissy Carroll
Sure thing! 🙂
Mia
This has been truly inspiring and helpful. Exactly what I was looking for! Thank you very much for sharing and keep up the good work 🙂
James Canning
Hi Chrissy,
Really helpful. Learned few new things. Thanks a lot.
Maryam
Great.very well explained.but i still have a question….how can i post pictures in my blog post? and if i don’t buy a domain can i run it successfully and earn money ?I am a beginner and nothing know about blogging…Need your more help to make my blog attractive
Chrissy Carroll
Hi Maryam – Sorry for taking a bit of time to answer this; your comment went into my spam filer 🙂 You can certainly start a blog without purchasing a domain or hosting but it’s going to be difficult to monetize it that way. I would recommend spending the very minimal amount to do a domain and hosting as it will give you far more flexibility for building a successful site. As far as adding pictures – when you are logged into Wordpress, you can upload photos under the media section.
zahidah saleema
helpful with screenshots Thanks for sharing.
Mike D
Do I need to be a personal trainer to start my own fitness blog? I’m just a fit guy with a lot of non-school gained knowledge about weight lifting and dieting, intermittent fasting, fitness mindset, etc. I feel like I have lot to offer, but I don’t want to present myself as a trained professional.
Chrissy Carroll
Hi Mike – sorry for missing this earlier; I’ve been dealing with about a billion spammy comments on this site and yours got mixed up in that folder. 🙂 You can definitely still start a fitness blog and share your personal experiences. I think examples of workouts you do, fitness mindset stuff, etc is all great. I would be careful about anything that could be construed as medical advice (i.e. specific nutrition advice) – and I might add a disclaimer to the site that notes your not a licensed fitness professional – but otherwise I think there’s room for all of us to share!
I will say as far as SEO goes, you’re probably going to have better luck ranking if you do have credentials from an EAT standpoint for Google (expertise, authoritativeness, and trust). It’s one of the factors that goes into ranking. A trainer certification is fairly inexpensive to pursue, so it might be worthwhile to do if you have hopes of monetizing the blog over time.
I hope that helps – let me know if you have questions. 🙂
Zola
Pretty much complete and very accurate! Thanks for sharing! 🙂 Keep up the good work!
Jennifer Mary
The article is very helpful for starting a blog site on fitness , specially the six item you are dexcribe very clearly and widely , i appriciate your advice and i think it will help me to learn very origine from fitness blog. the article is the source of inspiration of young and new fitness conscious people. thank you.
Chrissy Carroll
glad it was helpful! 🙂
Leo Harry
Hello this is Leo Harry. I’m new to lifting and was wondering if you can share a really good workout plan that you do or have heard of that is very effective and that can be done on a weekly basis.
Bulet Kumar
It’s really nice content !!! Thank you so much for sharing this. It is so interesting and informative blog.
Michael Butler
What have you found to be the best ways to attract readers to your blogs?
Chrissy Carroll
For myself, SEO and Pinterest have been the best ways to grow traffic. Have you read this post about doing keyword research yet? It’s definitely made the biggest impact for me in accelerating blog growth: https://buildawellnessblog.com/keysearch-review/
Jesse MATI
Thank you so much! thinking of starting a blog, you saved me so much time researching. Appreciate it.
Chrissy Carroll
Glad it was helpful! 🙂